Showing posts with label blowgun. Show all posts
Sunday, June 7, 2015
New Blowgun Video
Regular readers of my blog will remember my doing a post or two about blowguns. The "native blowgun" has fascinated me since I was a boy. As an adult I have played with both manufactured as well as home made ones off and on over the years. Within the last couple years, not only have I made improvements to my home made ones, but have also found a new use for them as a teaching aid.
Each semester, I do a graphic demonstration of pneumatics principles for my students in Hydraulics and Pneumatics lab. I shoot darts into a board from across the room using a home made blowgun. It's quite amusing to see the "yeah, right - whatever" looks on students' faces as I take the blowgun out and load it with a dart. It's even more entertaining to see the looks on their faces and hear a few of them gasp when they see and hear the darts slam into the board. Most are left with no further doubts regarding the power even a few PSI of air pressure can deliver.
To follow is a link to my latest YouTube video. This was shot at a high frame rate and slowed down so the flight and impact of the dart can be observed.
InKarlsLab - Blowgun Video
Enjoy :)
P.S. One of the most memorable remarks a student made to me in class early on one semester was "I wanna know when the darts come out." He had obviously heard about it from the prior semester's students.
Saturday, July 27, 2013
More on Blowguns
A while back, I wrote a post about making and shooting a homemade blowgun. Shooting blowguns is becoming quite a popular sport - both in the United States as well as in Japan. And it's inexpensive and thus affordable by nearly anybody. It's also one of the safest of the shooting sports if one uses some common sense.
My previous blowgun post may be found here:
http://inkarlslab.blogspot.com/2011/10/pvc-blowgun.html
Recently, I have found some other web sites on blowgunning that I think are well worthwhile to check out. A couple general interest ones are here:
This one is a great discussion group that covers all aspects of making and using blowguns.
http://blowgunforum.com
The guy who did this site has an engineering background, and offers some interesting analysis as well as some construction ideas of his own.
http://www.polar-electric.com/Blowgun/Darts/index.html#TableTop
Here is an organization devoted to furthering blowgun shooting as a sport.
http://usblowgun.com/
Measuring Performance
Anyone seriously pursuing the shooting sports will at some point want to measure the velocity of their projectiles. Velocity has a direct impact (no pun intended) on both accuracy as well as, in the case of hunting, how effective it is at killing the intended game. Relating to blowguns, velocity measurements also give a quantitative measure of how one's lung power is developing over time.
Regular readers of this blog have also seen my "Poor Man's Ballistic Chronometer" plans. This definitely follows the old adage that "necessity is the notherhood of invention." I did not have the money in the family budget to buy a ballastic chronometer for measuring dart and arrow velocities, so I did some research and built my own out of about $15 in electronic parts. The article, done in two posts, starts here:
http://inkarlslab.blogspot.com/2012/01/poor-mans-ballistic-chronometer-part-1.html
The engineer I mentioned above had a somewhat similar idea, though he did things a bit differently. He has written some cool looking software that is free for downloading. Looks like a viable idea, though I doubt it would work well outdoors or in environments with a lot of background noise. Here's his setup:
http://www.polar-electric.com/Blowgun/Software/Dartspeed.html
A Word of Caution:
This should be common sense, but in view of how rare a commodity it is in this world today, the following bears mentioning:
NEVER aim a blowgun at, or shoot at, another person or any animal you don't intend to kill and eat!
There have been some news stories about people who have shot at ducks and geese in municipal parks with blowguns, resulting in darts still being lodged in their bodies. Do NOT do a stupid stunt like that! This gives ALL of us who engage in blowgunning as a sport a bad name and could result in blowguns being made illegal EVERYWHERE - as they already have in Kalifornia and Massachusetts.
If you want to hunt small game with a blowgun, as some folks successfully do, make sure you have the right type of equipment and comply with all local laws!
Children and teenagers should be well supervised when using this or any other weapon.
Sport blowgun shooting can be a fun and safe activity for people of all ages and from all walks of life. Blowguns, darts, or the makings for doing your own, are available just about anywhere and are quite inexpensive. I did mine and the darts for about $10 worth of supplies found at the hardware store and/or around the house.
Labels:
ballistic chronometer,
blow dart,
blow gun,
blowdart,
blowgun
Saturday, January 7, 2012
Poor Man's Ballistic Chronometer - Part 2

In my last post, I detailed the hardware for making the poor man's ballistic chronometer. That post can be seen here: http://inkarlslab.blogspot.com/2012/01/poor-mans-ballistic-chronometer-part-1.html
Today I show how to use it.
Before I go farther, I should remind folks to wear appropriate eye protection when shooting any weapons and to make sure no people or animals are anywhere near the target or behind the firing range. This seems like common sense, but in this age I'd better say it anyway.
With that matter handled ...
As was explained in the first part, the poor man's chronometer works with a computer's sound card to capture the instant the dart leaves the muzzle and the instant it hits the target. Using a sound editing program such as Audacity, one can measure the interval between these two events. Audacity is quite versatile, is free, and is available for both Windows and LINUX computers. There is some support for certain Mac OSes, too. Since it is free and readily available for most people, and I've used it for nearly 10 years on LINUX systems, Audacity is what I'll detail here. If you have something else, feel free to use it - the basic idea is the same.
First, A Word About Sound Cards
Nearly every computer sound card has a microphone level input. Microphones tend to provide a signal of just a few millivolts. The same is true of the modem speaker - 'noisemaker' - that I used for my target strike microphone sensor. Some sound cards are also furnished with a line level input. "Line level" is generally a few hundred millivolts - 300 being quite common.
If you build my circuit and have a sound card that accepts line level inputs, by all means use that. You'll want to delete the resistive attenuator on the output of the OP amp - just keep the coupling capacitor and hook it up directly.
Because my particular sound card ONLY has a mic level input, I used the attenuator in the output of my circuit shown in the previous post. If you are using a mic level input, these resistor values should get you somewhere "in the ballpark".
Microphone Inputs on sound cards often use a "stereo" 3.5 mm (1/8") plug. The reason for this is many computer microphones get their power from the computer itself, and so either the 'tip' or 'ring' contact is used for power - generally anywhere from +5 to +9 volts, and the other remaining contact is for the audio. You need to do an Internet search on your particular hardware and see how yours is wired. Failing that, here's what I did:
With Audacity or other sound recorder app open and 'recording', connect a stereo 3.5 mm 'patch cable' to the mic input and touch the tip, then the ring, contacts with a screwdriver to see which one gives the tell-tale 60 Hz hum and/or clicks. They BOTH may, but the one you want will be much louder. (Yes, this technique is a bit "ghetto", but it's quick and works.) Connect the output of the circuit I described in "Part 1" to this contact and the ground sleeve.
Data Acquisition Using Audacity
Audacity can be downloaded from Sourceforge, or if you have LINUX, you can use your distribution's package manager to grab it and install it.
Once you have Audacity installed, open it and you will see something like the photo below:
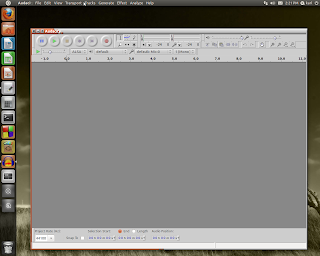
The menus will allow you to choose sampling rates, which sound card input to use, ...
Using the "Edit" menu, select "preferences". Under "preferences", select 'devices'. You should check to see that under "record" your device is shown. It will likely default to something like "Default: Mic:0". If you are using the line input, click on that box to change it to "Default: Line:0". Also make sure "mono" is selected - since you will not be making a stereo recording.
Now, select "Quality" in the left-hand menu bar. The sampling rate should be set to 44,100 Hz and the Default Sample Format should be set to "32-bit float".
Click "OK" to close that menu.
The Procedure"
1) Put the optocoupler on the muzzle of your blowgun, air pistol, whatever you're shooting.
2) Attach the microphone to the edge of the target - this can be done with duct tape as I did, or by whatever means you find suitable.
3) Make sure the muzzle sensor photo transistor and LED, microphone, power are all connected to the board described in my last post.
4) Start the 'record' mode in Audacity. You should see an oscilloscope-like trace being drawn. thumping the target or sticking your finger in the optocoupler should cause a visible trace, indicating everything is working. You may need to adjust the slide control for the microphone gain to get the waveform display you need. You do NOT want the waveform to be severely 'clipped' - that will potentially cause errors in your measurements.
5) Measure out your shooting distance from the target to the blowgun muzzle. In my test case shown here, I used 7 feet. I actually stood 12 feet away, so the MUZZLE of my 5-foot blowgun was at 7 feet from the target.
6) Shoot the blowgun. You should immediately see what appears to be two pulses close together on the graphical waveform in Audacity. Press the 'stop' button.
See the photo below - your waveform will look something like this. The part highlighted in grey is the blowdart firing; the other peaks in the trace are noise from the mic wiring being jiggled.
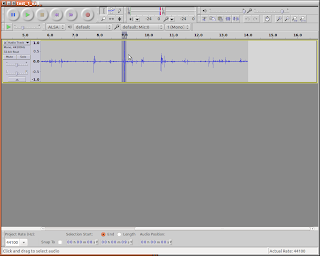
7) Using the cursor, highlight just the double pulse part of the waveform. Refer again to the above photo. Press the icon that looks like a magnifying glass with the -<-->- symbol below it. This will expand the part you highlighted to fill the whole window. See picture below.
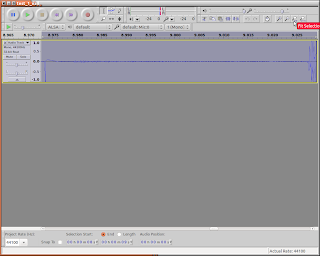
8) Look at the time track above the waveform trace: You will see timing to 1000ths of a second. Note the times the optocoupler pulse and the target "thud" start. Write these numbers down, or enter them into a spreadsheet.
9) Subtract the two numbers you got in step 8 and write that figure down. This is your time of flight. In the photo, note that the optocoupler triggered at about 8.973 seconds and the target "thump" started at about 9.027 seconds. This gives a time of flight of 0.054 seconds.
10) Simply divide the shooting distance you measured in step 5 by the number you calculated in
step 9. This result is your average velocity. Note from the example the average velocity during it's flight of 7 feet is approximately (7/.054), or 129.6 feet/second.
The average velocity is the average velocity over the whole trip from the muzzle to the target. This number "absorbs" any deceleration during the flight as well as the instantaneous muzzle velocity leaving the weapon.
To get a good approximation of the muzzle velocity, simply get close to your target. With a blowgun, a distance of 2-3 feet from the target should give a reasonable figure. If you are clocking a more powerful weapon such as an air rifle, you can (AND FOR SAFETY REASONS SHOULD) get a bit farther away from the target. Some experimentation will be in order here.
Below are a couple "action shots" of the completed unit. Sorry about the blurry picture of the target - trying to hold the camera AND the blowgun steady was a challenge ;) Note the sensor LED glowing at the blowgun muzzle.
Going Farther
While this is likely NOT the most accurate method of clocking these projectiles, it's pretty good. It's certainly good enough for what I need it to do. Basically I want to see how lengthening or shortening the tube, or changing its diameter, affects my blowgun's performance. I also wanted to experiment with different ways of making darts.
Archery: For this, I would do away with the optocoupler and simply put another mic on the bow itself - near the handle. I would measure the time from the bowstring "twang!" to the target "thump!" as the arrow hit. The rest I would do as described above. This would be an excellent way to compare my home made PVC bows to wooden or factory made ones. Simply shoot the same arrows at the same distance from the different bows and clock the speeds.
Firearms: One could do as I have done here, or simply use ONE mic with NO optocoupler and shoot at a target that would make a distinctive "clank" that would be audible in the recording. Measure that interval between the gun firing and the "clank", then subtract the time the sound took to travel the distances between gun and mic and target and mic. Divide the distance from the time calculated herein and you will have a pretty good idea of how fast your bullet was moving (on average). This technique is discussed on numerous web sites.
Crunching the data:
One can collect data from a number of firings on one recording. These can be plotted on a graph using any spreadsheet program. If you want to get fancy, calculate averages and standard deviations during your tests. Calculating standard deviations for your test runs will give you a good handle on how consistent your performance is. To aid in record-keeping you could even title your recordings something like "nail_7ft_01072012" - for "nail dart", 7 ft distance, and the date. Or "48_nail_7ft_01072012" could mean 48" blowgun, "nail dart", 7ft distance, January 07, 2012.
This would also be an excellent physics lab project for college students.
Wednesday, January 4, 2012
Poor Man's Ballistic Chronometer - Part 1

Many people who participate in paintball, archery, or other shooting sports have a desire to ascertain the velocities of their arrows, bullets, ... Usually this is done with a chronometer. Such devices can be rather pricy, and they are not something you can just walk into any hardware store or Wal-Mart and buy. Readers of this blog might recall that I enjoy archery and also have recently been shooting a primitive blowgun. See my post -
http://inkarlslab.blogspot.com/2011/10/pvc-blowgun.html
After shooting the blowgun a bit, I wanted to have at least a 'ballpark' idea of how fast the darts were flying. This information helps in comparing the performance of various dart designs, as well as giving an idea of how one's lung power is developing. I did NOT want to spend a lot of money on a chronometer, though. Some Google-searching turned up several pages suggesting the use of a computer's sound card as a data acquisition unit for ballistics measurements.
By far the best article I found on this was James Sluka's site at
http://www.inpharmix.com/jps/Jims_chrono.html. He apparently is a spudgun and BB gun enthusiast who, like me, decided to build his own chronometer.
How It's Done
From the basic concept he outlined, I designed a circuit using a photodetector to trigger when the dart leaves the blowgun and a microphone attached to the target to record the dart's impact. I use the sound card in my computer to record the signals, and some free audio editing software - Audacity - to measure the time from when the dart exits the muzzle to when it hits the target. With this time of flight data, and the distance from muzzle to target, one can calculate the average velocity of the dart. Here is the formula: distance = velocity x time, or
velocity = distance / time
While this formula gives the average velocity, a pretty good approximation of muzzle velocity can be had by simply shooting with the muzzle close (in this case, within 2 or 3 feet) to the target. Using such a short distance effectively minimizes the slow-down of the dart due to air friction. Comparing these approximate muzzle velocity measurements with 'time of flight' data at the distances you normally shoot from could yield some good insights into the darts' performance.
The Hardware
The circuit I designed, shown above (REVISED 02/04/2012), uses Mr. Sluka's basic idea with some modifications. I redesigned the "optical gate" to better suit a blowdart's geometry. I wanted to use the dart's airseal cone to start the time measurement just as the dart leaves the muzzle of the blowgun. So I oriented the photodetector setup somewhat off-center with respect to the tube so the shaft of the dart wouldn't prematurely trigger it. The detector is made from a 2" piece of 3/4" PVC schedule 40 pipe. I cut 1/2 way through the tube at the 1" mark, then split one of the sections lengthwise. This provides a spring-loaded 'expando' ring for clipping the device to the blowgun's muzzle. You can see the design and use in the photos below.
NOTE: These dimensions are for a blowgun made from 1/2" PVC schedule 40 pipe. If you are using a different size or type of tubing for your blowgun, you will need to use a different diameter tube for the detector housing, and quite possibly modify the mounting of it to the blowgun. The detector LED and phototransistor leads are 22 gauge stranded, twisted pair wire, approximately 10' in length. The same kind of wire can be used for the mic as well, since the mic impedance is fairly low.
The actual circuit consists of an Op Amp coupled to both a microphone and the phototransistor trigger circuit. When the light from the sensor LED to the phototransistor is interrupted, the 1 uf capacitor produces a pulse that is sent to the Op amp. Note that the phototransistor trigger circuit is coupled to pin2 of the OP amp through a 330K resistor - the same value as the feedback resistor on the amp. This provides essentially a voltage gain of 1. A voltage divider consisting of a 100K and a 15K resistor is used to provide about a 1.6 volt supply to the phototransistor trigger circuit. The mic, actually a noise maker out of an old PC modem, is also coupled to pin 2 of the OP amp through a 4.7K resistor. This provides the gain needed for the mic to work properly. Note that the 330K and 4.7K resistors, coupled to pin 2 of the OP amp, form a crude audio mixer. Power and ground are provided to the OP amp via a voltage divider comprised of a pair of 10K resistors. These are bypassed by capacitors to keep everything at AC ground and help prevent oscillation. The voltage divider is powered by a 12 volt battery. A diode protects everything from getting zapped if the battery is ever connected backward. I also provided a red LED to indicate when the power is 'on'.
The output of the OP amp is connected to the PC's sound card via a 0.1 uf capacitor followed by a voltage divider. The voltage divider, comprised of a 22K and a 2.2 K resistor, was determined by experimentation to work with my sound card's microphone input. If you have a 'line level' input on your sound card, you could probably eliminate these two resistors. Depending on your sound card, you may need to slightly adjust the ratio of these values, but the total resistance value should NOT be made significantly smaller, or circuit performance could be hindered.
The completed circuit assembly, built on a piece of experimenter's perf board measuring 1.75" x 3", is shown in the photo below:
Operation
With the detector, the mic, and the battery connected, use an audio amplifier or your PC to monitor the output. A tap on the mic should produce a clear sound; inserting your finger into the detector and pulling it back out should produce a click or pop sound. If these tests pass, the unit is ready to be used.
My follow-up post, "Poor Man's Ballistic Chronometer - Part 2", will explain how to use Audacity to record and interpret the data.
Labels:
ballistic,
blowdart,
blowgun,
chronometer,
speed of blowdarts
Saturday, October 8, 2011
PVC Blowgun

Regular visitors to this blog know already that, besides high-tech pursuits, I have a few of what some folks would consider rather anachronistic interests. Topics covered here have ranged from the latest Free Open Source Software, computers and networking, electronics, shortwave and amateur (ham) radio, to pre-1982 telephones and archery. Off and on during the past few weeks I have enjoyed shooting an unusual and primitive weapon: the blowgun.
A (very) Brief History:
Blowguns have been used by indigenous peoples all over the world, including those in the Americas. They originally were made from 7-10 foot lengths of cane or wood which had been bored out into a hollow tube. The darts ranged in length from six inches to over a foot in length and consisted of narrow splints made from bamboo, cane or other stiff material. The person shooting it would wind cotton or some other fibrous material on one end to serve as an air seal in the tube. These darts in some cases were tipped with plant or animal-derived poison; in other cases they were used "as is" to shoot small game. Some people took birds with a short, relatively heavy "blunt" cylindrical or marble shaped dart designed to stun, rather than penetrate the prey.
As an aside, one book I read a few years ago indicated that the native blowguns and darts brought back by European explorers may have inspired the invention of the reciprocating steam engine. Indeed, the operating principles of both ARE strikingly similar - both involve a compressed gas acting upon a movable piston.
Modern-day blowgun use:
Even today, some peoples inhabiting the Amazon River Basin and other remote areas of the world still use blowguns for hunting. Some native American tribes hold contests and give shooting demonstrations as part of keeping their cultural traditions alive. During the past couple decades in America, many people have enjoyed them as an outdoor sport. There are even organizations that promote blowgun shooting as a sport:
In the US, The United States Blowgun Association
http://usblowgun.com/
and internationally, The International Fukiyado Association (IFA)
http://www.echigo.ne.jp/~dhiguchi/index_e.html
Parts of this site are written in Japanese.
Now, for the details of my blowgun:
The blowgun is 50 calibre, consisting of a 5 foot piece of 1/2" ID schedule 40 PVC water pipe. A 1/2" to 1.25" pipe bushing serves as the mouthpiece. The larger end was heated with a heat gun until pliable and flared slightly - this gives a more comfortable surface to seal against one's mouth.


The darts are made from bamboo kabob skewers purchased at the grocery store. The air seal cones were made from 1.5" square pieces of printer paper folded to the cone shape, then glued to the skewers. When dry, the whole dart assembly was coated with spray paint for moisture resistance.
I haven't gone into any more detail because nothing here is unique - there are many sites on the Internet where one can find details on constructing just about any kind of blowdart imaginable.
In the picture of the darts, a shorter dart made from a roofing nail is shown next to the bamboo skewer dart. The paper cone air seal is identical to that on the skewer dart. Though the roofing nail is shorter and heavier, it flies more reliably and carries a much greater impact with the target. The foam archery target cannot be used with these because, even at a 50 foot range, the nail darts bury themselves beyond retrieval into the target's surface. A thin sheet of plywood would be most appropriate for stopping these projectiles.
The "range" shown in the top picture is a parking spot in a municipal park. From the 'near' end of the white line to the wood fence where the target is positioned measures approximately 25 feet using a measuring tape. All of the targets shown in the pictures were shot by me standing as this distance, unless otherwise noted.
In one of the close-up shots, one can see that a dart pierced the air seal (cone) of another one already in the target. Almost the blowgun equivalent of "splitting the arrow" in archery.
The green circle in the photo shows where two of the roofing nail darts buried themselves into the target face. One was shot at 25 feet; the other was at approximately 45 feet. The skewers penetrate between 2 and 2.5 inches into the target.

Subscribe to:
Posts (Atom)