Covered Topics

Please see the list of the topics I've covered. It's located near the bottom of the page. Thanks for stopping in!!

Saturday, December 31, 2011

Home-made Telephone Amplifier For Conference Calls


Years ago, one used to see all sorts of schematics for telephone amplifiers in hobbyist electronics magazines. Radio Shack used to sell them for about $19. Today, such things are not commonly written about, and factory made ones (if you can find them) are expensive. I have a recurring need for an amplifier that will allow several people in a room to monitor a conference call. Two way functionality is NOT needed - although we can still use the handset if needed. To follow is my modern-day solution.

The above schematic shows a circuit I designed for handling this problem. It uses a 600 Ohm, 1:1 line transformer which was salvaged from a discarded computer modem card. The 0.047 mf capacitor and some of the electrolytic capacitors were also gleaned from the modem. The OP-amp is a NE 5532 low noise amplifier. The circuit uses a single-ended 12 volt DC supply. A 7809 regulator regulates the circuit to 9 volts. A power LED alerts the user that the unit is 'on'. A 'hold switch' is also provided so the phone can be hung up after the call is established (more on this later). The circuit (for now) provides a line level output to feed a pair of amplified computer speakers. Later, I plan on adding an IC such as an LM381 and a small internal speaker. I allowed room for this upgrade when purchasing the enclosure.

I built the circuit on a piece of perf board bought from Radio Shack. Each of the holes has a copper ring around it on the bottom side of the board; the top side is completely unclad.

How It Works
The Op Amp is wired as a differential amplifier to minimize AC hum or other noise carried in on the phone line. The transformer coupling is efficient and provides isolation from the phone line. The potentiometer between the two amplifier stages is simply a volume control. The circuit provides line-level signal for use by amplified speakers. It could also be fed to the LINE-level input of a computer sound card or a tape recorder.

The OP-amp receives its 'split power supply' of + and - 4.5 volts via the voltage divider formed by the two 10K-Ohm resistors seen in the upper left-hand side of the schematic. The two capacitors keep the supply rails at AC ground.

The 'hold switch', seen in the lower left-hand side of the schematic, does two things:
1) Provides a 'dummy load' on the phone line to simulate a telephone being 'off the hook'. This allows one to hang up the phone after the call is established - allowing the listeners to talk privately in the room during the conference. The load consists of a pair of 2 W resistors from my junk box. Any resistor or combination equal to 100 - 200 ohms at 5 watts should be fine. The resistor WILL get warm, so keep it away from the OP amp and voltage regulator.
2) An LED indicator lets users know the phone is effectively 'off the hook' and can't receive calls. The bridge rectifier protects the LED from damage due to high reverse voltages; the 'ring' voltage can reach 90 volts AC. The bridge also allows the LED to work regardless of the line's DC polarity - phone jacks are often wired 'backwards'.

The voltage regulator does not need a heat sink due to the very low power consumption of this circuit. All told, it draws about 5 mA.

Lead dress is not critical, but try to keep them short to minimize stray hum pickup or oscillations.

To Use:
1) Pick up the phone and dial the number; do whatever you normally do to start the conference.
2) Flip the 'hold switch' - the 'hold' LED should light.
3) Hang up the phone - you should hear the teleconference but the other callers won't hear what's going on in the room.
4) Adjust the volume to whatever's comfortable.

5) When you're done, simply turn the hold switch off. The call will disconnect.
6) Turn off the power switch.
That's all there is to it!!

This circuit works quite well for me, with very little AC hum or other noise. I'm in the process of building it in to a plastic project box. When this is done I'll try to post a picture of it here.

I drew the schematic using gschem, from the gEDA toolkit in LINUX. The resulting product is saved as a PNG file. You can read about gEDA in my previous post.

Drawing Electronic Schematics With gschem In LINUX


For some time I have needed software for generating electronic schematics for posting here as well as for my work pursuits. In a nutshell, I wanted something that was free and that preferably would run in a LINUX environment. After a bit of looking online, I found the gEDA toolkit. gEDA stands for GPL'd Electronic Design Automation tools. gEDA is a suite of tools for schematic capture and PCB layout. It takes a bit of getting used to, and I personally find it a bit cumbersome to use, but it IS free and works.

On my Ubuntu 11 system, I tried to use apt-get install form the command line, but ended up having problems when the End User License Agreement box came up. Apparently there are some fonts that need to be installed which don't fall under the normal GNU license. The box to click "OK", as in "I Accept", didn't render properly on the command line; I had to abort the installation and use the graphical "Synaptic Package Manager" tool. When I used the Synaptic Package Manager all went Ok and I had gEDA installed in about 5 minutes.

In order to draw a schematic, you need to use the "gschem" tool. Readers who install gEDA may have a menu icon to start "gschem". I used the command line to invoke "gschem" due to continuing issues with the "Unity desktop" on my Ubuntu 11 system.

Some pointers to get you started:
When gschem starts, you are confronted by a black background. If you are like me, you will want to switch to a white "paper" with colored symbols, lines, ...
Do this by going to the "view" menu and selecting "Light color scheme". NOTE: Any time you close gschem, the background will default to the dark color scheme the next time you start gschem - even if you saved your file with a light background. So when you re-open your file, don't freak out if the 'paper' is dark, just go to 'view' menu and reset it.

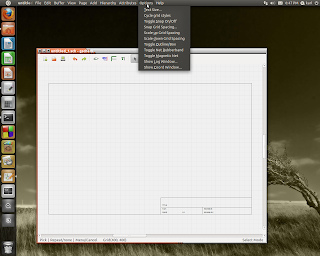
Under the 'Options' menu, you can change the grid spacing, text size, and other environment behaviors. See the photo above.

You will definitely want to make sure that the 'Toggle Snap on/off' control is set to "off" - otherwise you will go insane trying to place components accurately as they jump around.

If your mouse has a wheel, zooming in or out will be much easier. As you edit your drawing, you will be zooming in or out regularly.

The best way I found to learn gschem is to try out the various menu selections and functions.

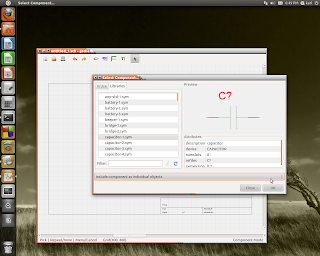
When selecting a component from the component menu, make sure you select the "Include component as indivdual objects" option. This allows you to change labels, change the default pin numbering on op amps, ... See the second photo.


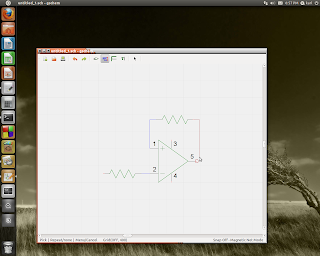
The third photo shows the wiring tool in use. To run a wire, left-hand click on whatever point you want to start. If you are maneuvering around other components, left-click whenever you are changing directions. As you approach another wire or connector, a little red ball will appear. Simply left-click on that to complete the connection. When you complete a connection, left click, then right click with your mouse to 'detach' - otherwise you will have lines zig-zagging from that point all over your drawing.


To SAVE your drawing, go to the file menu and select the 'save' option.

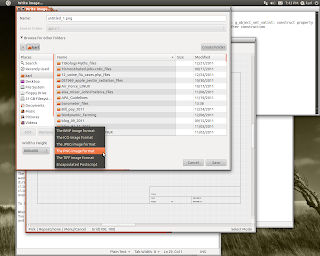
When you are finished and want to publish the drawing, select 'Write Image' under the 'file' menu. You will have a few choices as to file format and resolution. Set those parameters to what you want and save. You should now have a schematic that can be read in any image viewer or browser.

Thursday, December 29, 2011

Container Gardening: What Plastics To Avoid

Once again, I'm working on starting some plants indoors during the Winter. I have been surfing the Internet for ideas on how to grow larger quantities of small vegetables indoors. There are several folks on youtube.com who are using PVC pipe, as well as recycled drinking water bottles, as growing containers. Plastic water bottles are very cheap or even free, and 4" PVC pipe makes a really slick growing trough. Both can be used in high density configurations for growing lots of plants in a small space. Here's the catch: PVC pipe, as well as certain plastics used in food containers, actually leach toxins into the food or liquids they contain. Bisphenol A, or BPA, which is used in certain food and drink containers, has come under scrutiny as far as potentially causing birth defects, sexual abnormalities in small children, reproductive harm in male adults, neurological damage, and possibly even obesity. Chronic exposure to the pthalates found in PVC plastics can cause liver damage and other serious human health problems.

So, What to use?
I checked with a friend and colleague who is quite knowledgeable in chemistry. He recommends polyethylene or polybutylene plastics for gardening or potable water. He added that the plastic bins I bought at Wal-Mart for growing plants in a couple years ago should be safe, since they are made from polyethylene. I checked online regarding the 5-gallon buckets that are commonly used for bulk restaurant foods. These, too, are made from polyethylene - and SHOULD therefore be safe. About Home Depot, Lowes, or Wal-Mart 5 gallon buckets? They APPEAR to be made of the same polyethylene, but one should probably check before using these!!

The links below offer more information regarding which plastics are considered safe and which to avoid. Note that there is some conflicting information on polypropylene - I would avoid it due to some sites talking of it being an endocrine disruptor.

http://www.greenamerica.org/livinggreen/plastics.cfm

http://toxicswatch.blogspot.com/2008/11/toxic-leaching-from-polypropylene.html

http://archive.greenpeace.org/toxics/pvcdatabase/bad.html

A growing container should also be of a light or medium color. I learned the hard way a few years ago that the dark colored pots the nurseries use once and throw away can overheat in the sun and cause the plants' roots to burn. It would look crummy, but perhaps these can be used in a pinch if wrapped with reflective mylar or foil. I'd be wary of painting them due to chemicals in the paint possibly leaching through the bucket into the soil.

Shelves or supports used in a window garden should be sturdy - containers filled with soil are surprisingly heavy and will only get heavier as the plants grow. I use a frame made of 2" x 4" lumber for mine.

Sunday, December 25, 2011

Cyber-Clouds In My Coffee*

We have all heard all the hoopla about cloud computing, and how it is the greatest thing for mankind since sliced bread. It's been harder than I would expect to get a coherent explanation of what cloud computing really is. Boiled down, it refers to a paradigm in which computing is basically a "service" or a "utility" that you pay a monthly fee to use, rather than as something you buy in a box, take home, setup, and plug in. [I think of it as akin to regularly sending one's laundry to a laundry service as opposed to buying a washer and doing it at home.] Taken to its ultimate end, it could involve having your applications software hosted on a remote server, and also your data stored elsewhere. You would access your applications and data from anywhere there is Internet access via small, relatively cheap commodity devices such as tablet computers and "smart phones".

While it probably does have its place, its widespread implementation has some important and potentially negative ramifications for Joe Average User. Especially in this day of terrorism, government crackdowns, and a general lack of accountability on the part of Big Business. The huge new legal and ethical issues surrounding the use of this technology are unprecedented and could take years to resolve.

Before you swallow all the marketing hype "hook, line, and sinker", check out this article quoting Richard Stallman, activist, privacy advocate, and computer programmer:

http://www.guardian.co.uk/technology/2008/sep/29/cloud.computing.richard.stallman

The article, and the ones linked to at the bottom of this post, do quite a bit to de-mystify the general concept of cloud computing by striping away the marketing mumbo-jumbo to get to its essence.

Here are a few quotes highlighted from the article:
Stallman said "But there has been growing concern that mainstream adoption of cloud computing could present a mixture of privacy and ownership issues, with users potentially being locked out of their own files."

"One reason you should not use web applications to do your computing is that you lose control," he said. "It's just as bad as using a proprietary program. Do your own computing on your own computer with your copy of a freedom-respecting program. If you use a proprietary program or somebody else's web server, you're defenceless. You're putty in the hands of whoever developed that software."

He goes on to tell people "to stay local and stick with their own computers."

He said it more eloquently than I could have. Using my laundry analogy above, one must trust that the laundry service won't lose the wash, spill bleach or dye on it, overcook it in the dryer and shrink it, return it to the wrong person, ...

Here's where it "hits home":
Typically, my ISP is 'down' an average of two days per month. I have few viable options for Internet services in my semi-rural location. It's not that the infrastructure isn't here for more service providers; it's the fact we have one 300# gorilla that has cornered the market and for all practical purposes locked out the competition. I'd be crazy to want my access to my music, school homework, business files, ... contingent upon having access to the Internet. That's just a couple of the 'local issues'. But there are much larger implications.

Having observed the government crackdowns on Internet and phone service in places like Egypt and parts of the Arab World, and the continuing government control of the Internet in places such as China, I have a very cautious and skeptical attitude toward anything in which we as individuals and small businesses are asked to (or told we must) give up any more control over our own data and infrastructure.

* In keeping with giving proper attribution of ideas to their owners, the title of this post makes reference to the song "You're So Vain", by Carly Simon. "Clouds in my coffee" refers to illusions, or having "cloudy" vision so you can't see things clearly.

The following sites will help "part the clouds" surrounding this potentially game-changing technology:

http://www.techtangerine.com/2009/06/02/ten-reasons-why-cloud-computing-is-a-bad-idea/

http://www.guardian.co.uk/technology/blog/2008/aug/06/whengoogleownsyouyourdata

http://www.zdnet.com/blog/london/defense-giant-ditches-microsofts-cloud-citing-patriot-act-fears/1349?tag=nl.e539


A short side bar - but related issue:
The Obama administration and our illustrious congress critters are working to pass a bill that would give the U.S. Government the power to shut down and/or censor Internet and presumably telephone access for US citizens at the slightest whim. Another bill - the so-called "Protect IP Act" - in the works essentially gives large companies such as Microsoft and Hollywood studios carte blanche to censor our access to many websites we use everyday. See the short video at http://vimeo.com/31100268 to understand the far-reaching implications of this legislation.
I've talked about this and related topics in my posts regarding Internet censorship, service interruption, and the need for "grass roots" neighborhood "mesh networks". Judging from my blog stats on those posts, my attempts to reach and warn people of the chilling effect this can have on our basic rights of free speech in the digital age have failed. But please bear in mind that until 911, legislation such as the "USA Patriot Act" would have seemed unthinkable to most Americans. For those interested in more information about Internet Censorship and how to beat it, check out the following:
http://inkarlslab.blogspot.com/2011/10/more-internet-censorship-on-way-in-good.html

http://inkarlslab.blogspot.com/2011/06/wanna-beat-internet-censorship-build.html

Wednesday, December 14, 2011

MIPS 32 Register Swap Example Using QtSPIM


I've been away from my blog the past several weeks due to term papers, final exams and other mini-emergencies.

During that time I have seen a huge number of hits on my MIPS Example code page. You can find it here:
http://inkarlslab.blogspot.com/2011/09/mips-32-example-program-using-qtspim.html

In case folks would like some more code examples, I've published this piece of code - based loosely on one of my lab assignments this semester.

This code prompts the user to enter two integers through the console, places them into registers, then swaps the contents of those registers. It does so without the use of the MIPS "move" command. As with my previous material, it was run using the SPIM emulator version 9.1.4 - dated September 4, 2011.

CAVEATS: This is not the most elegant way of doing it. It was my first attempt at doing a register swap. This can actually be done using three or four lines of code, rather than my five, but my professors might get a bit angry if I gave away all the answers here. But this code does work and should help folks to get a head start on writing simple MIPS programs.

The complete code is as shown below. Simply copy and save this as "integer_swap.asm", or whatever .asm filename you like, using any convenient text editor such as Windows Notepad or LINUX Gedit.

NOTE: Sorry about the crummy formatting - I'm having trouble with tabs in the blogger interface.

===========================================================

## Program reads variables from console into registers
## then swaps the contents of those registers.
## Prints out contents before and after swap.
##
##
##
## Registers used:
## $v0 - syscall parameter and return value
## $a0 - syscall parameter
## $s1 - holds x
## $s2 - holds y
## $t0 - holds temp value


.text

main: # SPIM starts execution here


## Let's get x
la $a0, enter_x # Print msg for x
li $v0, 4
syscall

## read x into $s1.
li $v0, 5 # syscall 5 = read integer
syscall

move $s1, $v0 # x = Integer just read
## Message for x
la $a0, print_s1 # Prints "$s1 = "
li $v0, 4
syscall

## Let's display initial value of $s1 - so read x into $a0.
move $a0, $s1 # Move contents of $s1 into $a0
li $v0, 1 # Syscall for 'print integer'
syscall # Print value in $a0

## Print carriage return

la $a0, print_ret
li $v0,4
syscall

## Now, let's get y
la $a0, enter_y # Print msg for y
li $v0, 4
syscall

## read y into $s2.
li $v0, 5 # syscall 5 = read integer
syscall

move $s2, $v0 # y = Integer just read

## Message for y
la $a0, print_s2 # Prints "$s1 = "
li $v0, 4
syscall

## Let's display initial value of $s2 - so read y into $a0.
move $a0, $s2 # Move contents of $s2 into $a0
li $v0, 1 # Syscall for 'print integer'
syscall # Print value in $a0

## Print carriage return

la $a0, print_ret
li $v0,4
syscall

## Now, let's try and swap them - WITHOUT using 'move' command!!

addi $t0, $s2, 0 # Add the contents of $s2 into $t0
sub $s2, $s2, $s2 # Subtract the contents of $s2 from itself, thus zeroing it out
addi $s2, $s1, 0 # Add contents of $s1 into $s2
sub $s1, $s1, $s1 # Subtract the contents of $s1 from itself, thus zeroing it out
addi $s1, $t0, 0 # Add contents of $t0, same as former $s2, into $s1

## Now, lets print out the results:

la $a0, print_s1 # Prints "$s1 = "
li $v0, 4
syscall

move $a0, $s1 # Prints contents of $s1
li $v0, 1 # Syscall for printing of variable type integer
syscall

## Print single carriage return
la $a0, print_1ret
li $v0,4
syscall

la $a0, print_s2 # Prints "$s2 = "
li $v0, 4
syscall
move $a0, $s2 # Prints contents of $s2
li $v0, 1 # Syscall for printing of variable type integer
syscall

## Print carriage return
la $a0, print_ret
li $v0,4
syscall

exit:
li $v0, 10 # These two lines here for smooth exit from program
syscall

.data

enter_x: .asciiz "Enter a number for x, and press 'ENTER': " # Console prompt to enter the value for x
enter_y: .asciiz "Enter a number for y, and press 'ENTER': " # Console prompt to enter the value for y

print_s1: .asciiz "$s1 = " # Screen output to console
print_s2: .asciiz "$s2 = " # Screen output to console
print_1ret: .asciiz "\n"
print_ret: .asciiz " \n \n \n"


=======================================================
The picture above shows what should happen when you run the program using SPIM.

A slight variation of the problem asks you to do this without using a third register for temporary storage of one value (as was done here).

This basic algorithm can be modified slightly to permit the integers to be swapped WITHOUT using a third register.

HINTS: You will only need three or four lines of code to do the actual swap. There are basically two ways I know of to do it: 1) Use "add" and "sub" operations or 2) use XOR operations.

Hope this information is of help to someone.