Covered Topics

Please see the list of the topics I've covered. It's located near the bottom of the page. Thanks for stopping in!!

Saturday, January 28, 2012

The Pareto Rule: Its Profound Effect on Your Personal Finances


It's a given that this economy has been brutal on most people other than the top 10% income bracket. The popular press is filled with articles about managing money, where to invest your money, and how to save a bit here and there. Read any magazine or go online and you will find articles detailing how to use coupons to save on groceries, what time of year retailers tend to mark certain items down, how to cut your fuel consumption 10%, etc. While there's nothing wrong with saving gas - in fact there's much RIGHT with saving fuel - if you are paying $50/week on fuel, do you really think 10% (that's $5) saved will really get you out of the hole economically? REALLY? Especially when you consider an average 2-bedroom apartment rents for an average of $700 -$900/month in much of the U.S. Especially when food may cost a family of three $500/month? And your cable bill is likely another $100/month. Electric and gas - throw another $150/month average "on the grill". If you own a home in many areas you are likely paying thousands per year in county property taxes. I haven't even mentioned the chunk state and Federal income taxes take out.

Way back in the early 1900s, Vilfredo Pareto observed that 20% of the people in Italy at the time owned 80% of the land. In the late 1940s Dr. Joseph M. Juran applied this same idea to create a general rule that 20% of something accounts for 80% of the effects. This principle applies in many areas of life and commerce. Here are a few examples:
1) How many times have you observed in school that it's always the same one or two bad kids that cause most of the classroom disruptions?
2) It's well known by many police officers that a small subset of known criminals do most of the crimes in a given area.
3) At an electronic company I worked for several years, most of the failures and RMA returns we got were attributable to one or two problems. Granted, we got a few other types of complaints as well, but fully 85% were caused by one or two components we had lots of problems with. Once we got those two problem areas fixed, our warranty return rate went waaay down!
4) Typically, between 2 and 3 of a household's 8 or 10 expense categories account for 80% of its expenditures.

You may be saying "Gee, Karl. That's all well and good, but what does this have to do with paying my bills?"

Plenty!
The same "Pareto Principle" also applies to household and even business finances. Re-read #4 above and try an experiment:
Sit down and write out ALL your monthly expenditures, listed from largest to least. Right away you will see that out of the 8 or 10 things you listed, between 2 - 4 categories are where you spend most of your net income. For most of us, rent or mortgage occupies the number 1 slot. Food and/or car payments follow next, utilities, cable, and so on. A Pareto graph shows this in startling, visual clarity. A Pareto graph is similar to any other bar graph except the items are shown in descending order of their value - with the largest one being on the far left-hand side of the chart. This gives a quick visual idea of which few items are doing the most damage, as it were.

See the hypothetical chart above. You can see that "1" and "2" - whatever they are - amount to 81% of the expenses, while the rest of the stuff only amounts to 19% of the total. For many people rent and food, or rent and car payments, are their numbers "1" and "2". So if you CAN get into a cheaper rent situation, or put the wife to work saving on groceries with coupons, you can QUICKLY save MANY dollars per month. An hour a week spent couponing can indeed produce dramatic results! *(For those of you who noticed, YES, the "cumulative amount" line is missing on my example chart - but it is easily enough to calculate how close to the critical 80% line the cumulative total of the largest two or three items is. Simply add the first 2 or three itmes, then divide that figure by the grand total of everything. That will give you the fractional percentage of total expenditures those items make up.)


See the links below for examples and how to use a spreadsheet to create your own Pareto graphs.

http://asq.org/learn-about-quality/cause-analysis-tools/overview/pareto.html

http://www.vertex42.com/ExcelTemplates/pareto-chart.html

The Upshot of All This:
Basically, before you worry too much about saving $5 on a $50 weekly gasoline fill-up, consider dealing realistically with the bigger stuff FIRST. Granted, you might be stuck in a mortgage. Or leaving your apartment for another might not be feasible due to work or school ties. But likely there ARE other large, but somewhat negotiable bills that can be pared down with minimal effort that would save tens of dollars per month, if not more. I found it totally mind boggling during my teen years how my mother would scream about the cost of a roll of paper towels, while Dad drove 80 - 100 miles round trip to work every day. Between wear and tear, depreciation, and gasoline, driving that car ALONE was eating HUNDREDS of dollars per week!! We could have bought LOTS of paper towels - and other things - on the money saved if we moved closer to Dad's work or if he even got other employment closer to home. The family was hemorrhaging hundreds of dollars EVERY MONTH just in Dad's work expenses while Mom worried about $2/week in paper towels. Incredible. That's a bit like worrying about a scratch on the coffee table after a tornado just tore the roof off the house.

I'm in NO WAY saying "go out and waste gas, paper towels, or anything else"! What I AM saying is this society has got people buffaloed into worrying about a few pennies when it's often costing MORE to live "normally" than one makes working. Many parents and the schools have failed totally in teaching folks the realities of personal finance and earning a living in America. The media also strives to keep you focused on minutiae - they want you "on the string" working slavishly, watching their programming, and handing your hard-earned money to their advertisers.

A quick word about driving a car:
You can also do a Pareto analysis within any category of your expenses, too.

A good place to start is your car. You may or may not make payments, you have depreciation, you'll make repairs if you keep it long enough, you may pay taxes on it, ... These expenses can be Pareto-charted, too.

I have run the math, figuring PER MILE - guess what: Even as pricy as gasoline has been, fuel is the LEAST of my car related expenses when figured per mile. Maintenance (tires, batteries, tune-ups, belts, hoses, ...) followed by monthly insurance bills are what I'm really paying out for. "Per mile" figures prominently in how the car leasing companies figure their economics; and it's quite valid for households too.

People don't shell out weekly for a timing belt or a fuel innjector cleaning, so they forget to figure it into what they are really spending to drive.

Saturday, January 21, 2012

SOPA, PIPA, and Citizens' Need For A "Backup" Internet

Well, it looks like we have dodged a bullet - for now.

News sources reported yesterday that our illustrious Congress critters have backed off on ramming through legislation that could have shut down many websites - possibly including this blog. President Obama has also backed away from his original position, saying he won't be signing any SOPA (Stop Online Piracy Act) or PIPA (Protect IP Act) legislation right away. No doubt he doesn't want to make any more adverse waves, given this is an election year and the outcry these bills have caused.

These bills were put forth ostensibly to stop piracy of movies, music, and other intellectual property. As one who has created my share of copyrighted property, I fully understand and sympathise with ANYONE wanting theirs protected. But what these pieces of legislation would do is basically allow an individual or company to sue you and have your website shut down if you as much as linked to a suspicious site. If a reader's comment published on your blog contains a link to suspicious material, that alone could prove sufficient cause to have your entire site shut down. This, BEFORE you even get a chance to argue your case in court!

ALL of this could happen WITHOUT due process, folks. This basically renders null and void the idea of "innocent until proven guilty" - one of THE founding principles America was based on.

Laws such as this could put sites like blogger, you-tube, ... out of business because the legal risk they would incur by hosting the millions of videos and blogs would be overwhelming. Imagine the undertaking it would be for blogger to check EVERY blog out on their system for possible copyright violations.

As someone said a while back, "SOPA and PIPA are basically the legal equivalent of burning down your house because you found a couple roaches in the kitchen." There are better ways of handling the problem.

An Opening For Repressive Governments
Regularly we read about how China, Egypt, and other repressive regimes curtail their citizens' access to information online. Thus far, the Constitution and other legal protections have kept this from happening here in America. We have seen how easily the USA Patriot Act was pushed through Congress with nary a whimper after the 9/11/2001 attacks. Bear in mind that the Republicans soundly defeated similar legislation - calling it "Draconian" - when Bill Clinton proposed it just a few years earlier. The USA Patriot Act opened the door for, among many other things, the gross violations of our dignity we suffer for the privilege of boarding an airliner nowadays.

It is likewise quite conceivable that SOPA and PIPA could start us on a slippery slope whereby the US government and/or others could also more readily clamp down on the flow of information when "inconvenient truths" on ANY subject threaten to surface.

The Common Citizen's Workaround - Or Digital "Jungle Telegraph"
I've said it before, and I'll say it again: Common citizens should have ALTERNATIVE ways of communicating, exchanging news and information, as well as storing and accessing needed web content should there be any kind of censorship or shutdown of the Internet. Just as Amateur (HAM) radio allows communications when the regular infrastructure is down, a "mesh" network could quickly serve as the modern, information-age equivalent to "ham" or CB radio in an emergency. The software to do this is available online for FREE right now. All you need is the software and a wi-fi enabled laptop or desktop PC. Any desktop PC can be made wi-fi capable with an inexpensively purchased USB dongle.

How it works:
With a mesh network, a person's PC, laptop, or even a smart phone becomes a network repeater. Let's say I want to communicate with someone several blocks, or even miles away. I'd send out a signal, which would be picked up by the nearest computer or phone running the appropriate software. That device would then forward that to another one farther away, and so-on, until the message reached its destination. The more devices you get involved the more robust the network becomes. If you have several nodes in a neighborhood and one or two are lost, the signal still can go elsewhere and eventually get where it is going. Since unlike the regular Internet, there are MULTIPLE WAYS for an individual PC to connect, these networks are quite reliable. You are NO LONGER dependent on just your DSL or cable connection to get out. And neither is anyone else running a wi-fi mesh setup. And of course ANY of these devices could be running a server or host a shared directory for sharing files. Short of a major EMP incident (which would destroy most electronic hardware anyway), such a network would be very hard to completely jam or take down. The phones and PCs involved would still retain their originally intended functionality - this software runs quietly in the background.

Scalability: A mesh network can be as small as a few PCs in an apartment building or it could quite conceivably span an entire city. Licensed ham radio operators routinely transmit computer data over their radios - this is called "packet radio". Imagine the possibilities that open when you combine packet radio with mesh networks.

For more information I have included the following links:

http://www.nytimes.com/2011/06/12/world/12internet.html?_r=1

http://fabfi.fablab.af/

http://code.google.com/p/fabfi/

http://code.google.com/p/fabfi/wiki/HowToMake

http://inkarlslab.blogspot.com/2011/10/more-internet-censorship-on-way-in-good.html

http://inkarlslab.blogspot.com/2011/06/wanna-beat-internet-censorship-build.html

Friday, January 20, 2012

Running Windows in Virtual Box On A LINUX System


Virtual Box is an application that allows you to run an operating system within another operating system. Virtual box allows you to create one or more virtual machines within a Windows, LINUX, Mac, or Solaris host. With Virtual Box, you are actually running the "guest" operating system within an encapsulated environment. It behaves just as it would if it were installed natively on the hardware. The title of this blog is "Running Windows in Virtual Box On a LINUX System", but you can also run LINUX in Virtual Box on a Windows System.

Some viable uses:
You may be asking "Why do this?" Good question - and one well worth a couple paragraphs.

Running a "Virtual Machine" is an excellent way of testing new software, new releases of operating systems, or performing software quality assurance WITHOUT having to dedicate hardware to a single operating system. You get to keep whatever native environment you are comfortable with while you test or run an application in another environment. If you have a copy of Mac-OS running in a virtual machine, you can see what your web pages look like in a Mac browser without having to own an actual Mac PC.

If you have Windows software that will not work in Wine or Crossover Office, you can simply install Windows within Virtual Box on your LINUX system. The Windows operating system and software simply become as one more application running in LINUX.

A Slick Way Of Trying LINUX Without Commitment
If you would like to "install" LINUX but don't want to re-partition your computer or remove Windows just yet, why not run it within Virtual Box on your existing Windows system? If you don't like Ubuntu, for example, just delete it within Virtual Box and no harm done. You could have several virtual LINUX machines installed so you can compare distros and see how each one would run if it were running "native". Running LINUX in a virtual machine context such as this avoids the need for creating separate partitions for Windows and LINUX. If you decide to keep Windows and NOT use LINUX at all, you have NOT created any changes that can't be undone with a few simple mouse clicks. Pretty cool, huh?

My experiment
A week or so ago, I decided it would be fun to try running Windows VISTA in Virtual Box on a Mint 11 LINUX system.

Using Mint's package manager, I downloaded and installed Virtual Box. When you start virtual box from the menu, a "wizard" will guide you through the steps of selecting what operating system you want to use and how much disk space you want to allocate to that. From there, you will select the install media (DVD, CDROM, network drive, ...) on which the disk image for your selected operating system resides and then proceed to install it within Virtual Box.

The dialog screens are pretty much self-explanatory and I had VISTA installed in about 45 minutes. That is about typical for an install on my hardware, so using a virtualized environment didn't slow down the process any. Once I had VISTA installed, I started Virtual Box and selected 'VISTA' from the list of installed systems. See screen shot below.


A new window containing the Windows VISTA login screen opened on my Mint 11 LINUX desktop. See the screen shot at the top of this post.

The photo below shows the Windows VISTA desktop within a Window in Mint 11 LINUX.


Later on I might try the reverse: Installing LINUX within Virtual Box on a native Windows system.

You can learn more and/or download Virtual Box from https://www.virtualbox.org/

Saturday, January 7, 2012

Poor Man's Ballistic Chronometer - Part 2


In my last post, I detailed the hardware for making the poor man's ballistic chronometer. That post can be seen here: http://inkarlslab.blogspot.com/2012/01/poor-mans-ballistic-chronometer-part-1.html
Today I show how to use it.

Before I go farther, I should remind folks to wear appropriate eye protection when shooting any weapons and to make sure no people or animals are anywhere near the target or behind the firing range. This seems like common sense, but in this age I'd better say it anyway.

With that matter handled ...
As was explained in the first part, the poor man's chronometer works with a computer's sound card to capture the instant the dart leaves the muzzle and the instant it hits the target. Using a sound editing program such as Audacity, one can measure the interval between these two events. Audacity is quite versatile, is free, and is available for both Windows and LINUX computers. There is some support for certain Mac OSes, too. Since it is free and readily available for most people, and I've used it for nearly 10 years on LINUX systems, Audacity is what I'll detail here. If you have something else, feel free to use it - the basic idea is the same.

First, A Word About Sound Cards
Nearly every computer sound card has a microphone level input. Microphones tend to provide a signal of just a few millivolts. The same is true of the modem speaker - 'noisemaker' - that I used for my target strike microphone sensor. Some sound cards are also furnished with a line level input. "Line level" is generally a few hundred millivolts - 300 being quite common.

If you build my circuit and have a sound card that accepts line level inputs, by all means use that. You'll want to delete the resistive attenuator on the output of the OP amp - just keep the coupling capacitor and hook it up directly.

Because my particular sound card ONLY has a mic level input, I used the attenuator in the output of my circuit shown in the previous post. If you are using a mic level input, these resistor values should get you somewhere "in the ballpark".

Microphone Inputs on sound cards often use a "stereo" 3.5 mm (1/8") plug. The reason for this is many computer microphones get their power from the computer itself, and so either the 'tip' or 'ring' contact is used for power - generally anywhere from +5 to +9 volts, and the other remaining contact is for the audio. You need to do an Internet search on your particular hardware and see how yours is wired. Failing that, here's what I did:

With Audacity or other sound recorder app open and 'recording', connect a stereo 3.5 mm 'patch cable' to the mic input and touch the tip, then the ring, contacts with a screwdriver to see which one gives the tell-tale 60 Hz hum and/or clicks. They BOTH may, but the one you want will be much louder. (Yes, this technique is a bit "ghetto", but it's quick and works.) Connect the output of the circuit I described in "Part 1" to this contact and the ground sleeve.

Data Acquisition Using Audacity
Audacity can be downloaded from Sourceforge, or if you have LINUX, you can use your distribution's package manager to grab it and install it.

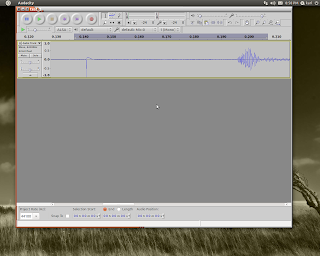
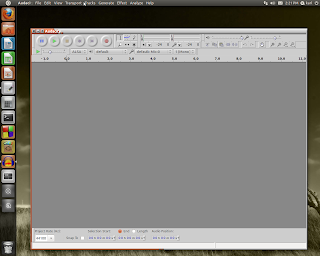
Once you have Audacity installed, open it and you will see something like the photo below:


The menus will allow you to choose sampling rates, which sound card input to use, ...
Using the "Edit" menu, select "preferences". Under "preferences", select 'devices'. You should check to see that under "record" your device is shown. It will likely default to something like "Default: Mic:0". If you are using the line input, click on that box to change it to "Default: Line:0". Also make sure "mono" is selected - since you will not be making a stereo recording.

Now, select "Quality" in the left-hand menu bar. The sampling rate should be set to 44,100 Hz and the Default Sample Format should be set to "32-bit float".

Click "OK" to close that menu.

The Procedure"
1) Put the optocoupler on the muzzle of your blowgun, air pistol, whatever you're shooting.
2) Attach the microphone to the edge of the target - this can be done with duct tape as I did, or by whatever means you find suitable.
3) Make sure the muzzle sensor photo transistor and LED, microphone, power are all connected to the board described in my last post.
4) Start the 'record' mode in Audacity. You should see an oscilloscope-like trace being drawn. thumping the target or sticking your finger in the optocoupler should cause a visible trace, indicating everything is working. You may need to adjust the slide control for the microphone gain to get the waveform display you need. You do NOT want the waveform to be severely 'clipped' - that will potentially cause errors in your measurements.
5) Measure out your shooting distance from the target to the blowgun muzzle. In my test case shown here, I used 7 feet. I actually stood 12 feet away, so the MUZZLE of my 5-foot blowgun was at 7 feet from the target.
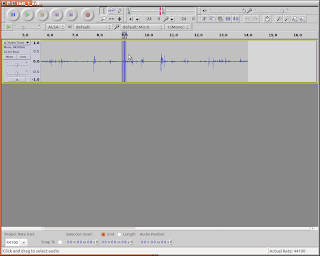
6) Shoot the blowgun. You should immediately see what appears to be two pulses close together on the graphical waveform in Audacity. Press the 'stop' button.
See the photo below - your waveform will look something like this. The part highlighted in grey is the blowdart firing; the other peaks in the trace are noise from the mic wiring being jiggled.


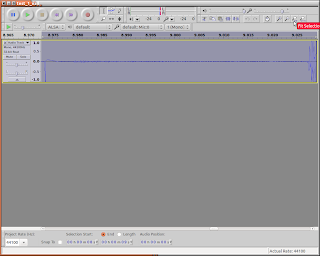
7) Using the cursor, highlight just the double pulse part of the waveform. Refer again to the above photo. Press the icon that looks like a magnifying glass with the -<-->- symbol below it. This will expand the part you highlighted to fill the whole window. See picture below.


8) Look at the time track above the waveform trace: You will see timing to 1000ths of a second. Note the times the optocoupler pulse and the target "thud" start. Write these numbers down, or enter them into a spreadsheet.
9) Subtract the two numbers you got in step 8 and write that figure down. This is your time of flight. In the photo, note that the optocoupler triggered at about 8.973 seconds and the target "thump" started at about 9.027 seconds. This gives a time of flight of 0.054 seconds.
10) Simply divide the shooting distance you measured in step 5 by the number you calculated in
step 9. This result is your average velocity. Note from the example the average velocity during it's flight of 7 feet is approximately (7/.054), or 129.6 feet/second.

The average velocity is the average velocity over the whole trip from the muzzle to the target. This number "absorbs" any deceleration during the flight as well as the instantaneous muzzle velocity leaving the weapon.

To get a good approximation of the muzzle velocity, simply get close to your target. With a blowgun, a distance of 2-3 feet from the target should give a reasonable figure. If you are clocking a more powerful weapon such as an air rifle, you can (AND FOR SAFETY REASONS SHOULD) get a bit farther away from the target. Some experimentation will be in order here.

Below are a couple "action shots" of the completed unit. Sorry about the blurry picture of the target - trying to hold the camera AND the blowgun steady was a challenge ;) Note the sensor LED glowing at the blowgun muzzle.


Going Farther
While this is likely NOT the most accurate method of clocking these projectiles, it's pretty good. It's certainly good enough for what I need it to do. Basically I want to see how lengthening or shortening the tube, or changing its diameter, affects my blowgun's performance. I also wanted to experiment with different ways of making darts.

Archery: For this, I would do away with the optocoupler and simply put another mic on the bow itself - near the handle. I would measure the time from the bowstring "twang!" to the target "thump!" as the arrow hit. The rest I would do as described above. This would be an excellent way to compare my home made PVC bows to wooden or factory made ones. Simply shoot the same arrows at the same distance from the different bows and clock the speeds.

Firearms: One could do as I have done here, or simply use ONE mic with NO optocoupler and shoot at a target that would make a distinctive "clank" that would be audible in the recording. Measure that interval between the gun firing and the "clank", then subtract the time the sound took to travel the distances between gun and mic and target and mic. Divide the distance from the time calculated herein and you will have a pretty good idea of how fast your bullet was moving (on average). This technique is discussed on numerous web sites.

Crunching the data:
One can collect data from a number of firings on one recording. These can be plotted on a graph using any spreadsheet program. If you want to get fancy, calculate averages and standard deviations during your tests. Calculating standard deviations for your test runs will give you a good handle on how consistent your performance is. To aid in record-keeping you could even title your recordings something like "nail_7ft_01072012" - for "nail dart", 7 ft distance, and the date. Or "48_nail_7ft_01072012" could mean 48" blowgun, "nail dart", 7ft distance, January 07, 2012.

This would also be an excellent physics lab project for college students.

Wednesday, January 4, 2012

Poor Man's Ballistic Chronometer - Part 1


Many people who participate in paintball, archery, or other shooting sports have a desire to ascertain the velocities of their arrows, bullets, ... Usually this is done with a chronometer. Such devices can be rather pricy, and they are not something you can just walk into any hardware store or Wal-Mart and buy. Readers of this blog might recall that I enjoy archery and also have recently been shooting a primitive blowgun. See my post -
http://inkarlslab.blogspot.com/2011/10/pvc-blowgun.html

After shooting the blowgun a bit, I wanted to have at least a 'ballpark' idea of how fast the darts were flying. This information helps in comparing the performance of various dart designs, as well as giving an idea of how one's lung power is developing. I did NOT want to spend a lot of money on a chronometer, though. Some Google-searching turned up several pages suggesting the use of a computer's sound card as a data acquisition unit for ballistics measurements.

By far the best article I found on this was James Sluka's site at
http://www.inpharmix.com/jps/Jims_chrono.html. He apparently is a spudgun and BB gun enthusiast who, like me, decided to build his own chronometer.

How It's Done
From the basic concept he outlined, I designed a circuit using a photodetector to trigger when the dart leaves the blowgun and a microphone attached to the target to record the dart's impact. I use the sound card in my computer to record the signals, and some free audio editing software - Audacity - to measure the time from when the dart exits the muzzle to when it hits the target. With this time of flight data, and the distance from muzzle to target, one can calculate the average velocity of the dart. Here is the formula: distance = velocity x time, or

velocity = distance / time

While this formula gives the average velocity, a pretty good approximation of muzzle velocity can be had by simply shooting with the muzzle close (in this case, within 2 or 3 feet) to the target. Using such a short distance effectively minimizes the slow-down of the dart due to air friction. Comparing these approximate muzzle velocity measurements with 'time of flight' data at the distances you normally shoot from could yield some good insights into the darts' performance.

The Hardware
The circuit I designed, shown above (REVISED 02/04/2012), uses Mr. Sluka's basic idea with some modifications. I redesigned the "optical gate" to better suit a blowdart's geometry. I wanted to use the dart's airseal cone to start the time measurement just as the dart leaves the muzzle of the blowgun. So I oriented the photodetector setup somewhat off-center with respect to the tube so the shaft of the dart wouldn't prematurely trigger it. The detector is made from a 2" piece of 3/4" PVC schedule 40 pipe. I cut 1/2 way through the tube at the 1" mark, then split one of the sections lengthwise. This provides a spring-loaded 'expando' ring for clipping the device to the blowgun's muzzle. You can see the design and use in the photos below.


NOTE: These dimensions are for a blowgun made from 1/2" PVC schedule 40 pipe. If you are using a different size or type of tubing for your blowgun, you will need to use a different diameter tube for the detector housing, and quite possibly modify the mounting of it to the blowgun. The detector LED and phototransistor leads are 22 gauge stranded, twisted pair wire, approximately 10' in length. The same kind of wire can be used for the mic as well, since the mic impedance is fairly low.


The actual circuit consists of an Op Amp coupled to both a microphone and the phototransistor trigger circuit. When the light from the sensor LED to the phototransistor is interrupted, the 1 uf capacitor produces a pulse that is sent to the Op amp. Note that the phototransistor trigger circuit is coupled to pin2 of the OP amp through a 330K resistor - the same value as the feedback resistor on the amp. This provides essentially a voltage gain of 1. A voltage divider consisting of a 100K and a 15K resistor is used to provide about a 1.6 volt supply to the phototransistor trigger circuit. The mic, actually a noise maker out of an old PC modem, is also coupled to pin 2 of the OP amp through a 4.7K resistor. This provides the gain needed for the mic to work properly. Note that the 330K and 4.7K resistors, coupled to pin 2 of the OP amp, form a crude audio mixer. Power and ground are provided to the OP amp via a voltage divider comprised of a pair of 10K resistors. These are bypassed by capacitors to keep everything at AC ground and help prevent oscillation. The voltage divider is powered by a 12 volt battery. A diode protects everything from getting zapped if the battery is ever connected backward. I also provided a red LED to indicate when the power is 'on'.

The output of the OP amp is connected to the PC's sound card via a 0.1 uf capacitor followed by a voltage divider. The voltage divider, comprised of a 22K and a 2.2 K resistor, was determined by experimentation to work with my sound card's microphone input. If you have a 'line level' input on your sound card, you could probably eliminate these two resistors. Depending on your sound card, you may need to slightly adjust the ratio of these values, but the total resistance value should NOT be made significantly smaller, or circuit performance could be hindered.

The completed circuit assembly, built on a piece of experimenter's perf board measuring 1.75" x 3", is shown in the photo below:


Operation
With the detector, the mic, and the battery connected, use an audio amplifier or your PC to monitor the output. A tap on the mic should produce a clear sound; inserting your finger into the detector and pulling it back out should produce a click or pop sound. If these tests pass, the unit is ready to be used.

My follow-up post, "Poor Man's Ballistic Chronometer - Part 2", will explain how to use Audacity to record and interpret the data.

Our Cars: Yet Another Avenue of Cyber Attack?

For many years, I have been a fan of older cars. In my opinion the simpler their design, the better. I've owned both late model and cars that were built in the 1960s. While older vehicles are indeed more maintenance intensive, they are generally easier and less expensive to repair than anything built in the past 15 years or so. Today, I just read an article that bolsters my appreciation and respect for older vehicles.

The article I refer to, dated January 3, 2012 in the LA Times Online, points out another possible avenue of cyber attack: Our increasingly computerized cars. Today's cars come equipped with many computer based systems that control the engine, brakes, transmissions, air conditioning/heat, lights, ... Some cars can even park themselves, thanks to new technological developments. A TV ad for a certain Ford vehicle, run ad nauseum in my market area, immediately comes to mind.

The main problems seem to stem from onboard wireless communications devices such as bluetooth, OnStar, and even Wi-fi connections. We're NOT talking about your laptop or phone; we're talking about systems that are built into the car to support features we're seeing advertised more and more lately. These interfaces to the outside world can allow cyber attackers to hack into automotive systems and change files, or assume control of the car's essential functions such as braking. The article goes on to explain that not only Al Qaeda terrorists, but even common criminals could exploit such vulnerabilities to commit all manner of mayhem. Imagine, for example, a stalker - by remote control - causing a woman's car to malfunction so she becomes stranded by the side of the road. Or a disgruntled dealership employee causing problems en masse with customers' vehicles; the article cites an actual case like this at a Texas used car dealership. Or, imagine someone by remote control hacking and disabling the alarm system on your car so they can get in to steal it or take whatever possessions you have stored in the car.

According to the article, some folks at Ford and Chrysler are concerned about present or future vulnerabilities. Let's hope they are concerned enough to take serious action before people get hurt.

You can find the entire text of the article here:

http://www.latimes.com/business/autos/la-fi-auto-hackers-20120104,0,6784778.story?track=lat-pick